


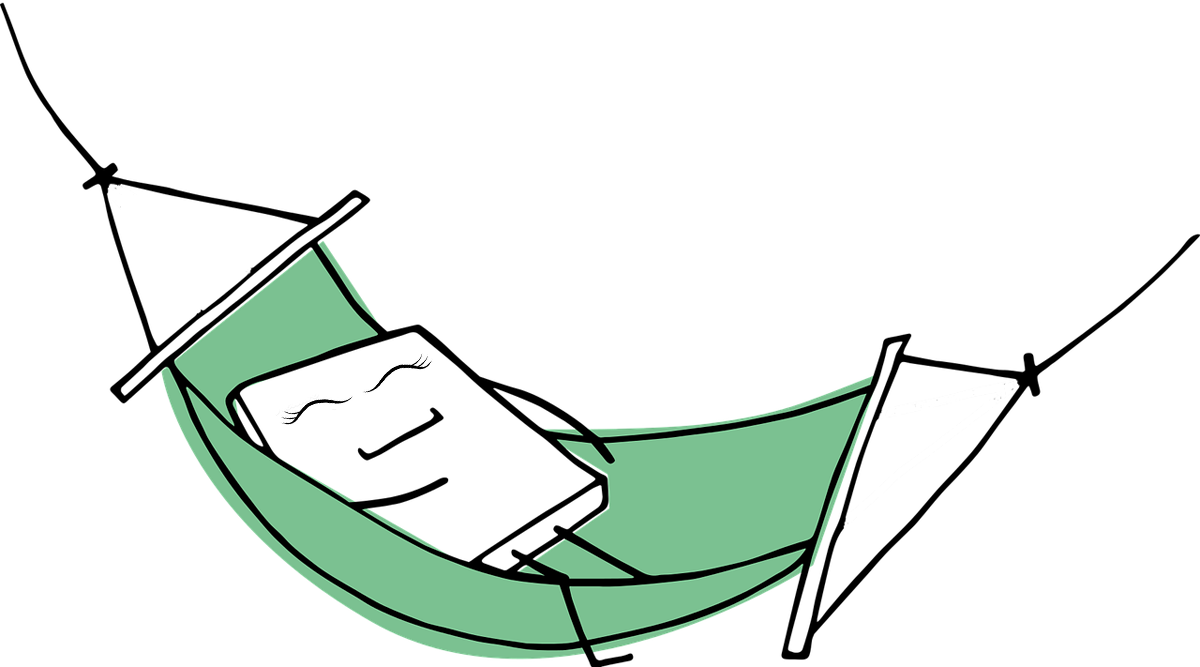
Project: A Summer Hammock (preview)
Relax in your backyard with a book, enjoy a cup of coffee on the porch, or swing peacefully as you bond with nature at your favorite campsite in a colorful, decorative hammock. It’s said that hammocks guarantee an amazing sleep experience, whether it’s an afternoon nap, or a full night’s rest. Simple to sew, this hammock is made using decorator fabric for the hammock front and is lined with sturdy canvas. Closet-pole rods and nylon rope support the hammock.
Making the Hammock
The complete version of this article is available on the ASG Members Only blog and requires member login.
CLICK HERE to read the full article. Not a member? Join online!
Make It With Wool Contest Entry: Coat & Dress
I joined ASG during Covid, having been motivated by a rediscovered ASG flyer. I had been given the flyer some years prior at the ASG booth at the Sewing and Stitchery Expo in Puyallup, WA where I had been wearing my WA State winning Make it With Wool (MIWW) garment and was approached by the chapter President who strongly recommended I join. Covid’s isolation gave me the impetus to seek out an avenue to engage with others sharing a common interest. The Silverdale, WA chapter was the perfect fit and I joined 3 Neighborhood Groups and soon was Zoom meeting with a fabulous and talented community of sewists.
It Started With Wool
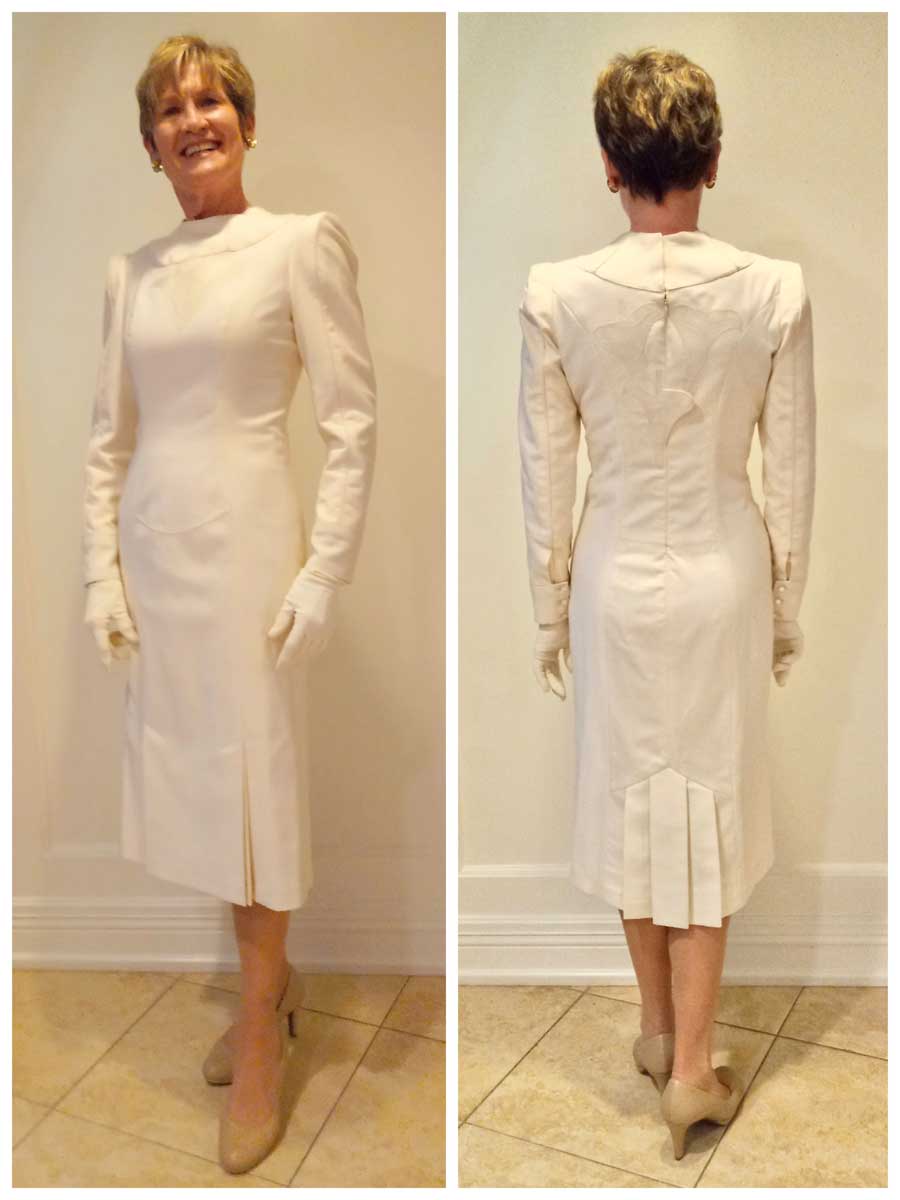
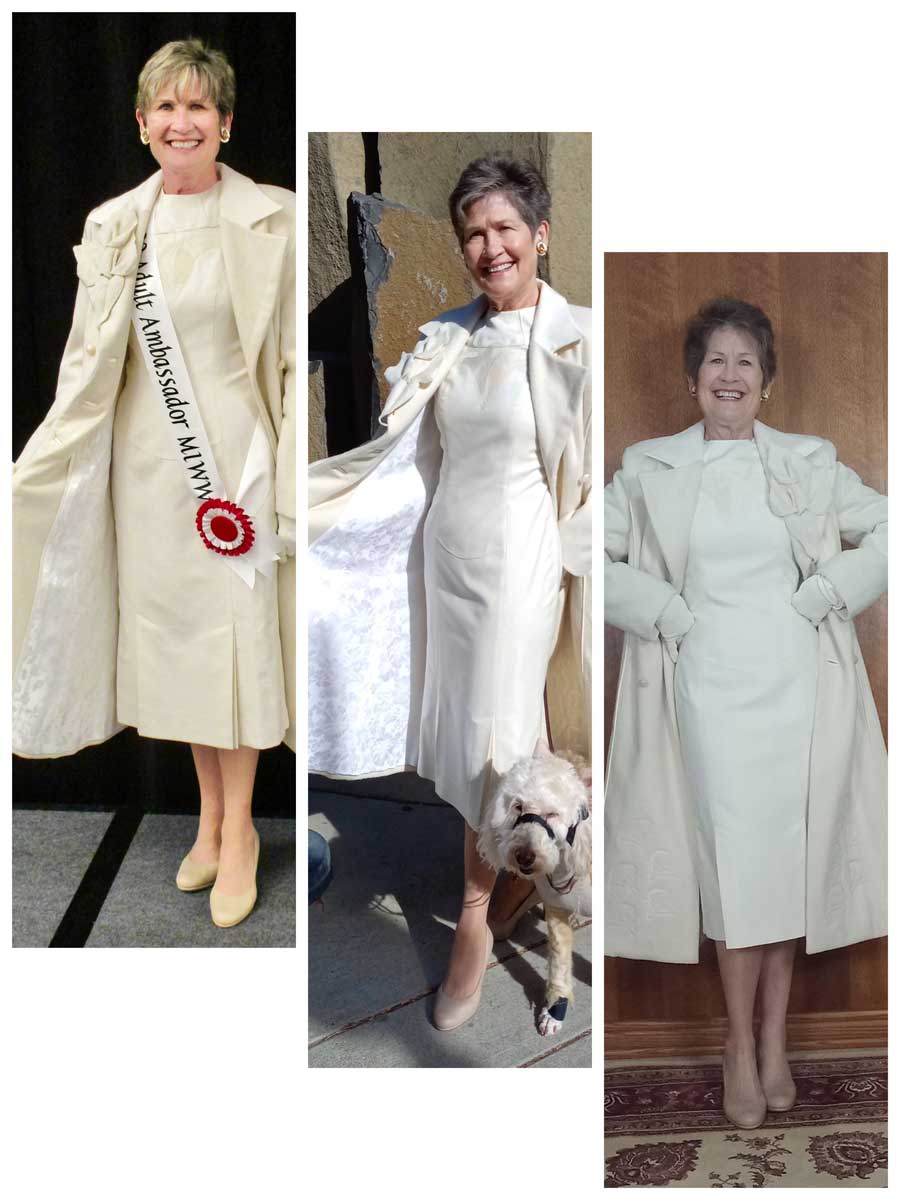 My primary interest is garment sewing, especially with wool fabric and fibers. Wool is a wonderful fabric and fiber to create with. I crochet, knit, felt, needle felt and sew with wool. The wool coat and dress described in this article were specifically made for this year’s Make it With Wool contest, an annual competition that promotes the beauty and versatility of wool by showcasing wool’s unique qualities in a variety of garment designs and details.
Inspiration: A tribute
The inspiration for the coat came from the beautiful coat created by designer Gabriela Hearst and worn by Jill Biden at the inaugural ball. The classic double breasted princess seam design, color, and theme set the foundation for the vision of the coat. Taking this example, a Vogue pattern (7144) was selected with a similar design.
The coat and dress feature varying design details and a variety of calla lily embellishments, a symbol of both sympathy and promise. The garments hoped to recognize and give tribute to the loss of so many to Covid and the promise of recovery by all the heroic efforts of our first responders, medical personnel and caregivers.
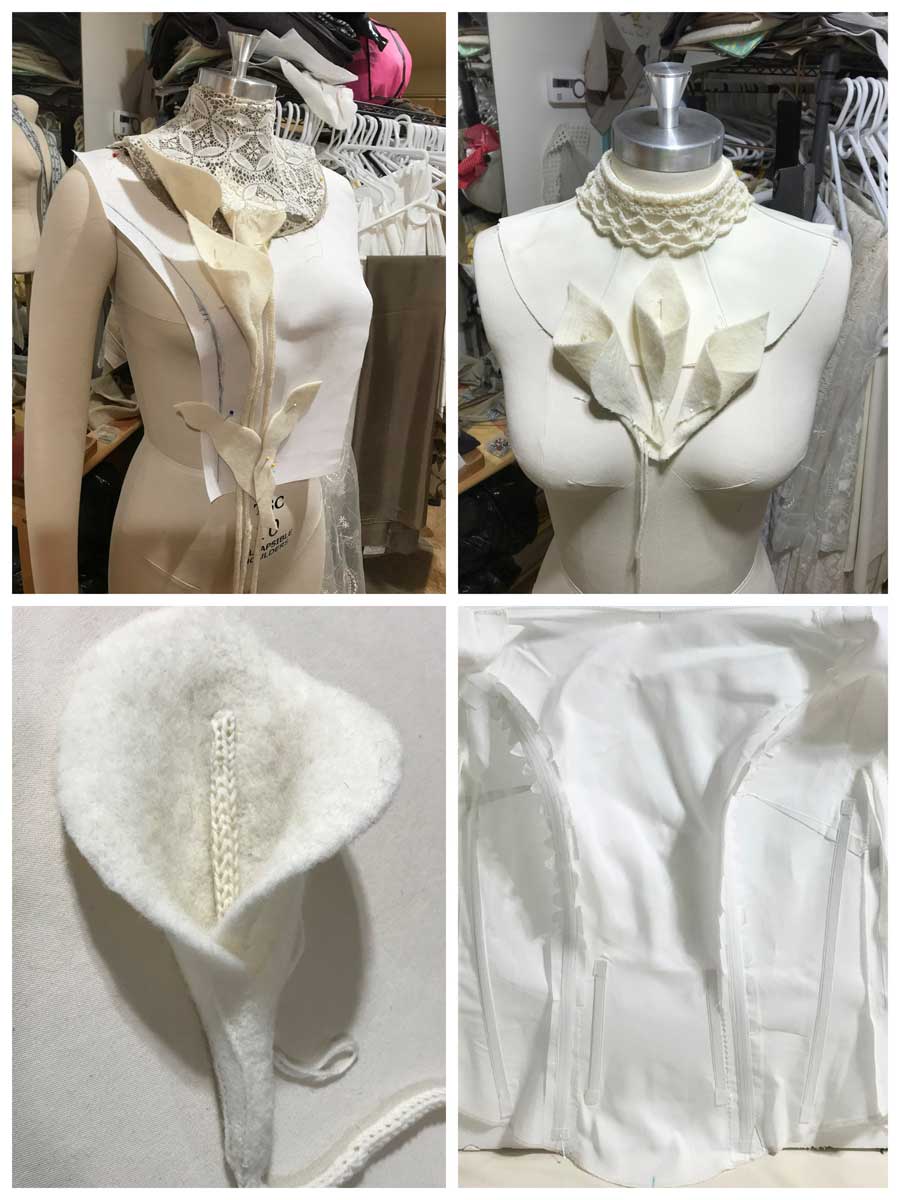
The decisions in bringing those details together into a coordinated and cohesive ensemble required exploring and experimenting with possible options. The process started with inspiration, settling on a detail, and then producing samples to determine their appropriate application in the garment. Many samples were prepared that never made their way into the final garment: boned interfaced bodice support, a lace collar, crocheted collar, a beaded crochet collar, felted calla lily, knitted cording, bobbin embroidery to name a few.
Making the Coat
Felting the Wool
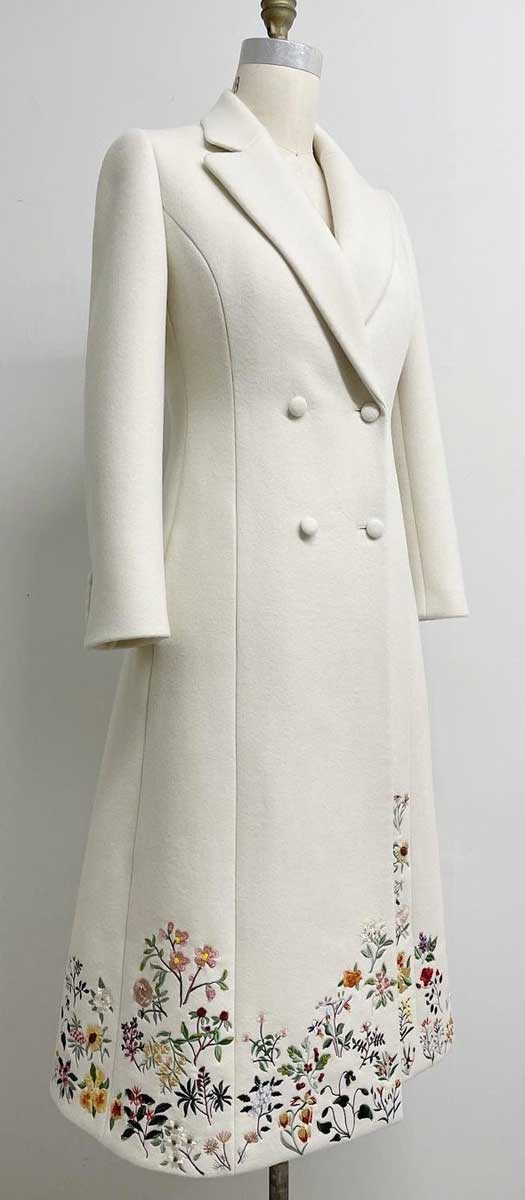
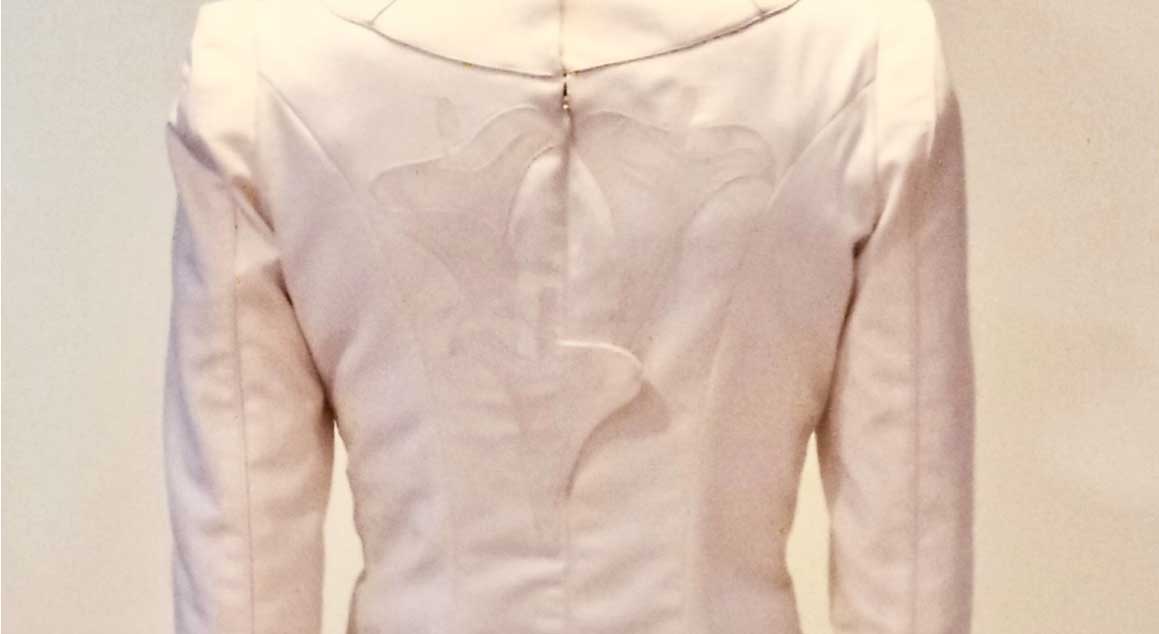
The calla lilies embroidered on the coat are an original graphic, digitized, and designed to repeat the pattern along the hem and upper back. The calla lilies on the coat’s lapel were created from felted worsted wool, sewn, shaped and hardened to closely match the specie’s flowers and leaf. The spadix, the center detail, was knitted with wool yarn, it’s stable shape made possible by utilizing feather quills from my geese. The 100% wool coat fabric was machine felted in several 2 yard batches. To lessen the fabric’s distortion and stretch during the machine felting (top loader only), the 2 yard fabric pieces are zig-zag stitched along the cut edge into a cylinder. Several pairs of flip flops aid the agitation. The smallest hot water setting is selected and a very small amount of wool fabric soap as well as baking soda is added to the tub. Three cycles are generally required to get the desired thickness and degree of felting. The spin cycle is stopped each time to again lessen distorting the fabric. The fabric was then air dried and shaped to accept the pattern layout.
Decorative Elements
The silk piping accents the princess seams and aids in the shaping and fit of the coat. The brocade lining is edged with a binding of the same silk fabric adding interest and detailing to the coat. A calla lily silver charm was added at the inside collar to further the theme of the coat. The coat hem was weighted at the front opening and at the back vent to result in a better hang at these openings. Bound button holes were used to add interest and a favored technique for quality garments. Vintage dome shank buttons adorn the double breasted closure. A valuable couture technique outlined in Claire Shaeffer’s new book, Couture Tailoring, A Construction Guide to Women’s Jackets was used to secure the non-buttoning shank buttons, resulting in their holding firmly and not flopping. The upper lapel fabric matches the fabric of the accompanying dress. The many details and embellishments are subtle, requiring closer examination and appreciation for their added value to the harmony and cohesion of the coat.
Making the Dress
The dress is my original design. The coat required a fitted dress to comfortably adhere to its silhouette. The bodice was the starting point. I find that for my body type, princess seams to be more conducive to a good fit. The bodice has a dropped waist to promote a more vertical line. I envisioned a simple but elegant silhouette with subtle intricate embellishments and design details. The dress is 100% Italian Super 150 Double Faced wool. In a self drafted design that required repeated fittings and numerous handlings, the off-white color of the fabric proved challenging to keep from soiling.
Sleeves
The extended cap sleeves were a new detail I wanted to incorporate into the original design. They required precise drafting and fitting to the bodice, since nearly no ease is offered in the sleeve cap. The grain and hang of the sleeve and their precise rotation in the armscye was critical for a proper fit. The 2-piece sleeve seams are also piped, accentuating the detail and adding structural support. A sleeve head was used between the sleeve cap and the extension.
Pleats
The front reverse pleats and the back “skirt pleats” were added to allow more movement while still maintaining the dress silhouette. They provided a subtle interest and animation in the carry of the dress.
Appliqué
The piped and 7-piece collar brings attention to the neck line and invites inspection of the subtly appliquéd 4-piece calla lilies below. The 4 piece appliqué is fashioned after a stained glass design. The appliqués are layered and applied on both the front and back bodice. The calla lilies appliquéd on the back bodice span the invisible zipper, requiring both sides of the exposed appliqué be finished. A clear plastic snap securely holds the tip of the calla lily in place once the zipper is closed.
Underlining
The dress is underlined with cotton voile. BIG MISTAKE! Normally, I use silk organza as an underlining but because the fashion fabric was so lightweight, I wanted more structure to support the bodice and front and back panels. Both the cotton and wool fabrics were washed prior to their laying out and cutting. The issue was the added shrinkage of the cotton underlining when the dress seams were pressed. It resulted in the wool fabric hanging or bagging between the vertical seams. The fix required removing all vertical seams, lessening the cotton voile seam allowances to remove the pull and bagging of the wool fabric. Removing all attachments of the cotton voile to the dress hem resulted in a smoother panel and seam. It was a major remake while being major lesson learned. The dress is now fully lined with silk charmeuse. The lining has a 3″ hem and is attached with thread chains to the same seam in the dress.
The final dress design was a progression and evolution of its details. The individual details, the piping, the extended cap sleeves, the front inverted and back skirt pleats, the pieced and piped collar, the buttoned cuffs, the calla lily appliqués and their extension over the invisible zipper all coalesced into a cohesive and harmonious well fitting dress.
The Contest
The coat and dress ensemble won at the Make It With Wool National Adult Division competition that was held January 20-23, 2022 in San Diego, CA. Twenty one state contestants competed in the contest. The top 6 placings were:
Adult Winner – Kim Vogley, Washington
Adult 2nd place – Becky Piette, Wisconsin
Adult 3rd place – Kelsey Clear, Michigan
Adult 4th place – Brenda Richardson, Arizona
Adult 5th place – Erin Hyde, Florida
Adult 6th place – Diane Spain, Oregon
Learn more about Make It with Wool at https://makeitwithwool.com/welcome
~Kim Vogley, ASG Silverdale, WA Chapter
Tips and Hacks for Machine Embroidery
Whenever ASG members are asked what they love about their organization, high on the list is always the willingness of fellow members to share ideas and help out with solutions. This is true, especially in neighborhood group meetings held in person or on electronic platforms.
The Princeton, NJ Chapter’s “Thread Magicians,” is an online machine embroidery group that is open to all ASG members regardless of their chapter affiliation. ASG members can complete the Group Request here. Non-members can join ASG as part of a chapter or become a member-at-large to participate in this group.
Here are just a few of the tips shared at a recent meeting:
Thread Nets
Marsha in Oregon said she rarely uses the thread nets that are supposed to be used on spools of thread to tame the feeding of thread from the spool to the machine. Instead, she places the nets on rolls of stabilizer to prevent them from unrolling while in storage as well and keeping the plastic use instructions right with the stabilizer. Since the nets are see-through, it is easy to see labels and instructions through the nets without removing them.
Storing Rolls of Stabilizer
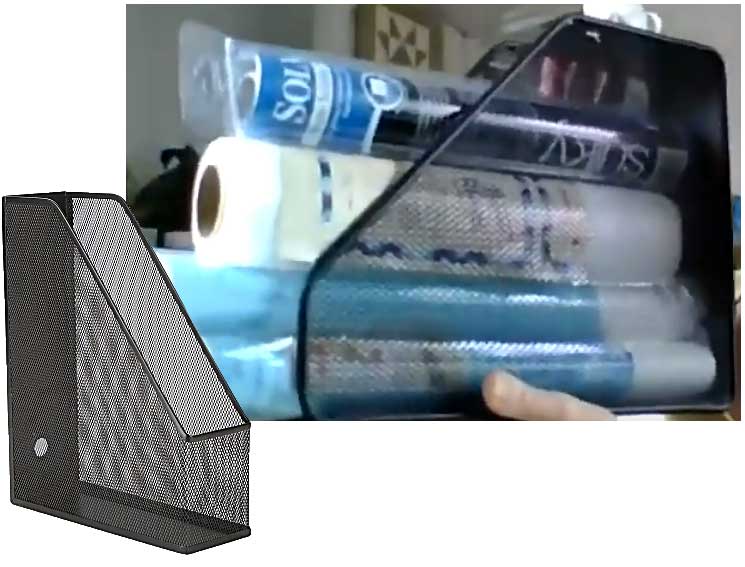 To store rolls of stabilizer, Dale from New Jersey suggested getting some magazine storage containers. The containers all have the same basic shape but can come in cardboard, plastic, metal, or wood. Turn them so they sit on their longest side and tuck the rolls of stabilizer inside. The containers allow the stabilizers to be stacked without fear of them rolling away.
Dale also added that if you have ever had thread unwind and become a massive bird’s nest right on the spool, she suggests turning the spool upside down and allowing the thread to unwind so the nest can be removed. (And yes, this one worked great!)
Thread Organizers
Beverly and Kendra, also from NJ, recycle egg cartons into thread organizers. They number the 12 or 18 compartment cartons and place thread spools into each compartment to keep colors in the order in which they will be used in a design. Even large cones can be inverted and placed in the cartons top down without any trouble. This certainly beats frantically searching for the right color only to find it rolled away during the last thread change. Kendra also suggested using a pet wrap like Coband to wrap around your hoop to prevent slippery fabrics from sliding in the hoop. It doesn’t leave a sticky residue like other tapes. Paper tape from the first aid section of the dollar store also works well for placement of pieces during appliqué or in-the-hoop projects.

Speaking of organizing threads, Constance from Florida suggested cutting pieces of clingy plastic into 1” x 6” or 2” x 6” strips to wrap around thread spools to keep thread from unrolling. The plastic can be purchased from a variety of box stores or recycled from packaging like those that blankets come in. To help keep track of the strips while using the thread, Constance places a line made with a grease pen or permanent marker down the center of the strip, providing a visual reference on an otherwise clear surface. This makes the strip easier to see when not on the spool. For her bobbins, she takes a small box and lines it with double sided tape. When she places bobbins in the box, the tape holds them in place, preventing them from falling out or bouncing around in the box and unwinding and becoming tangled. To be doubly sure the bobbins don’t unwind, she also uses aquarium hose cut to the specific width of her bobbins. She then makes a slit in the hose so that she can slip it around the bobbin holding the thread in place. While many members used ponytail bands to slip around spools and bobbins, the aquarium hose is a smoother, sleeker look and allows bobbins to slip easily into store-bought bobbin holders.
Organizing Appliqué Pieces
Andi in California likes to use page protectors from the stationery store to organize her appliqué pieces. She cuts out the various parts of the appliqué and places them in the page protector along with any notes or instructions. When she is ready to work, the pieces are all together and ready to go. These are especially helpful when she is traveling to a retreat to do the work. Unlike the paper plates she used before, the protectors can be stored in a notebook and don’t slide or allow pieces to escape.
Added Work Surface
While browsing a thrift store, Christine from NJ found a bedside table like the kind that are usually found in hospitals. She said she didn’t know what she would do with it, but she purchased it anyway. Now it is her constant companion while sewing. She can wheel it up to her cutting table and adjust the height to give her extra room for her cutting tools, or even move her sewing machine around the house or outside. It is extra sturdy and can easily handle the weight of her sewing machine as well as the vibration when sewing.
Spraying Adhesives
From Arizona, Sandy suggested cutting the bottom from a gallon milk container and placing the opening over the item she wants to spray with adhesive. She then takes her spray can nozzle and sprays through the top of the container. The sides of the milk container prevent the overspray from traveling around her sewing space and getting everything sticky.
Organizing Machine Feet
To organize her machine feet, Lynda from NJ uses a pill organizer. The compartments are just the right size for most feet and are easily seen through the plastic container. She also says a toe separator used for pedicures makes a great bobbin holder. And if you run out of toppers for embroidery, Glad Press and Seal will work in a pinch. It won’t wash away, but it tears easily.
Storing Embroidery Hoops
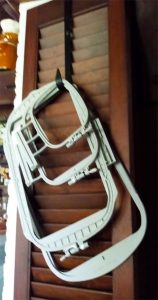 After breaking one of her embroidery hoops by laying it down on a table and then placing something on top of it, Rosemary from NJ bought a wreath hanger from a dollar store. She now slips the hanger over a door near her embroidery machine and actually remembers to place the hoops on the hanger when not embroidering. No more broken hoops!
Go Green
Elaine in Massachusetts shared her “go green” ideas. The Boston Chapter made lint cleaners for attendees at the 2019 conference. Members took a coffee stirrer and half of a chenille stem. The ends of the chenille stem were looped around and inserted into the opening at one end of the stirrer, and voila, a lint brush that gets into those tight spaces around the bobbin case for the embroidery machine or the serger. Elaine also puts her Edge gum boxes to use. She labels them and places her packages of machine needles inside so that she can see at a glance her packages of needles separated by size.
There were also endorsements of a number of products that members find especially helpful.
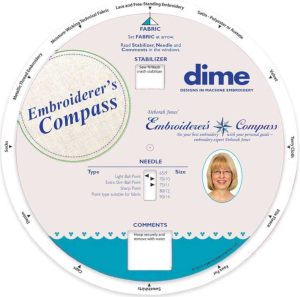
- Tina from Oregon recommends the Embroiderer’s Compass from dime for matching up the right stabilizer with the right fabric. By simply rotating the disks, this tool gives suggestions for the stabilizer as well as toppers.
- The Perfect Box Bottom is one of Gini’s suggestions from Texas. She says it makes squaring up the bottoms of boxes or purses a breeze.
- The Hoop Mat by dime was also noted by Beverly as a handy embroidery tool. It prevents the embroidery hoop from sliding away while trying to hoop the fabric. The lines on the mat also help with aligning items.
So, whatever part of the country you hale from, we hope you found some of these tips and hacks useful. Happy stitching!
~Rosemary Fajgier, former ASG Board Chair
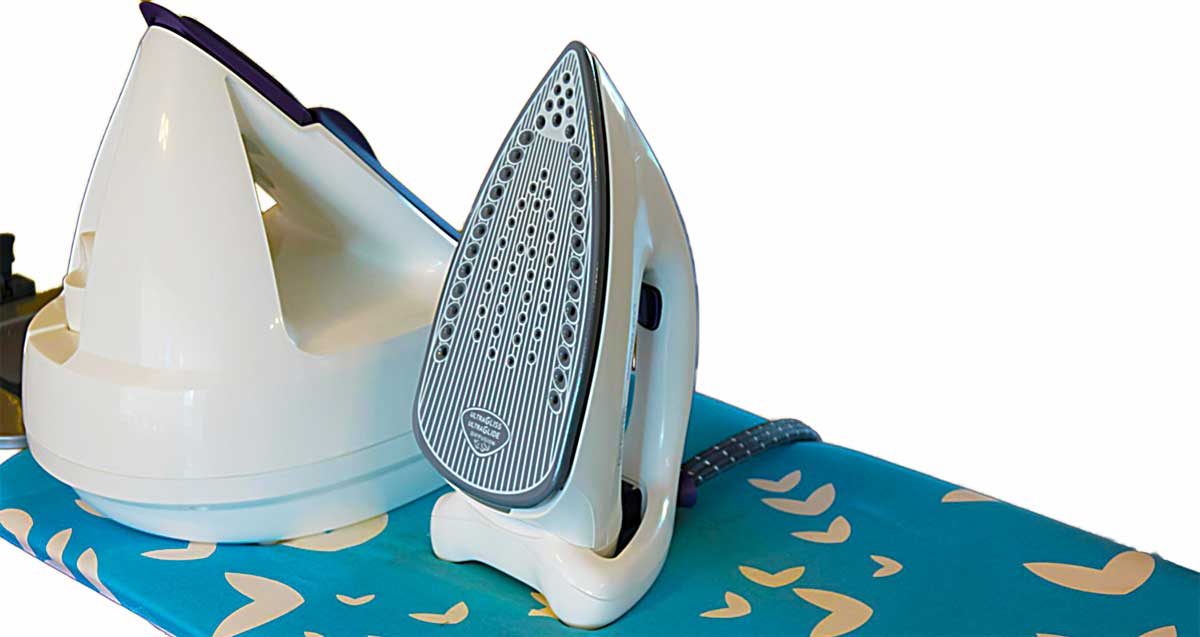
Pressing Matters: Choosing the Right Iron
Next to your sewing machine, your iron may be the most important item in your sewing room. Look for features that fit your sewing needs.
Auto shut-off
Some sewers love it, others loathe it—that “feature” that turns your iron off when it’s not used for a certain period of time. Shut-off times vary up to 15 minutes of non-use. Although designed as a safety feature, there are many irons without this option if you find it an annoyance.
Warming Ways
Some irons have dials, others have digital read-outs to tell you actual ironing temps, but still others list only fabric/fiber names, like cotton, silk or wool to indicate a safe temperature setting. A few brands offer only dots or arrowheads to indicate temperature ranges. Choose a brand with an indicator that works best for what you want to know.
Bottoms Up
You may never have given it a thought, but if you research irons, you’ll find aluminum, stainless and ceramic soleplates available. Some also offer a non-stick coating—ideal if you do a lot of fusing.
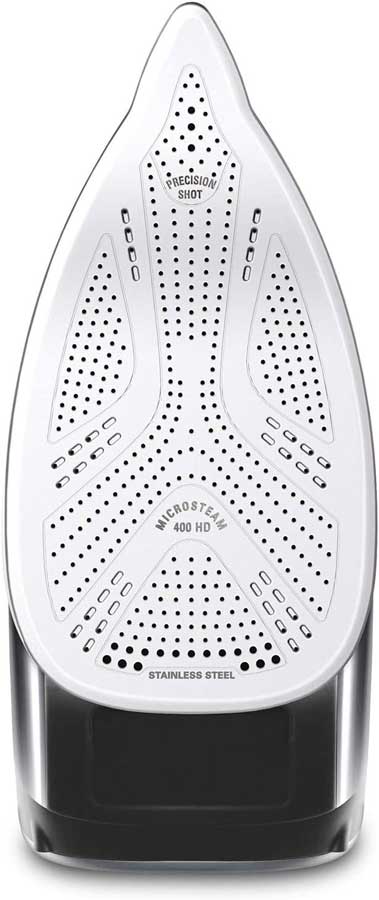
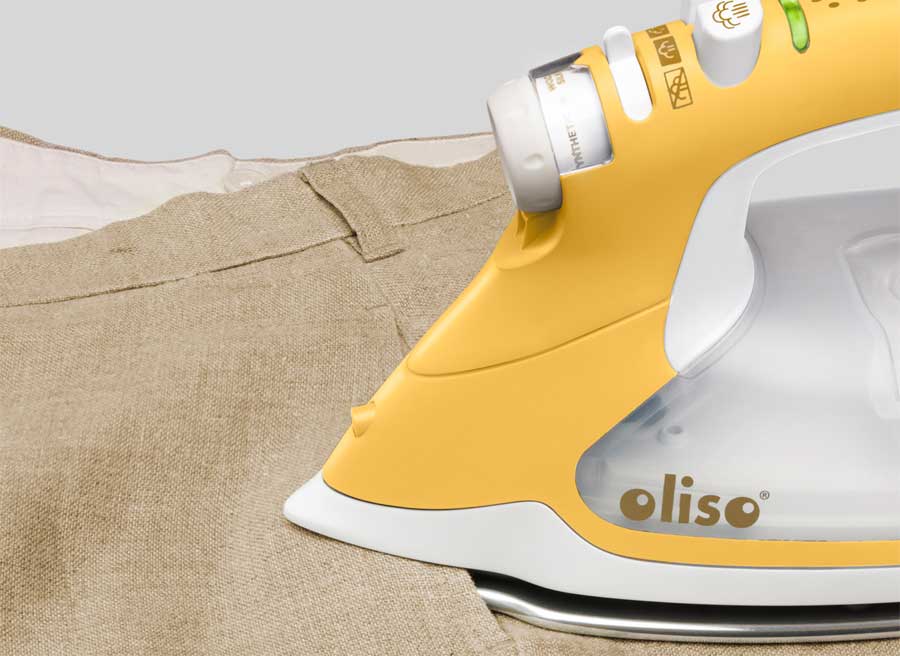
Depending on the type of sewing you do, the number of steam holes in the soleplate may be important. You can get more than 400, like in the Rowenta DW8270 Pro Master 1750 Watt X-CEL Steam Iron with 400 Hole HD Profile Soleplate pictured to the right, all the way down to less than 50, depending on the brand and model. If you do a lot of tailoring, look for a higher number of steam holes with many near the iron’s point.
The soleplate shape is also a consideration as some irons are very pointed with a space for detail pressing, while others are more rounded for more general use.
Hefty, Hefty, Hefty
Most home irons fall in the 1- to 5-pound range for weight. For tailoring, heavier is better as more pressure is applied to shape the fabric during construction.
Steamy Situations
 Sewists (and most quilters) love steam, and it comes in various forms. Some irons offer only a single steam setting, others offer adjustable steam–from bursts to continuous—depending on your needs. Irons should also offer a dry setting for those fabrics that can be damaged by water or for use with some fusible products. Some irons steam only in a horizontal position, while others can also steam in a vertical position.
If you like convenience, look for a removable water tank to take directly to the faucet for filling. A transparent tank lets you keep tabs on the amount of water in the iron and know when a refill is needed. Check the size of the water tank, as smaller capacity reservoirs require more frequent filling, especially if you’re using a lot of steam.
In addition to steam, some irons offer a misting or spray feature to allow for a bit of extra moisture in certain pressing situations—especially helpful for shaping fabrics and removing wrinkles.
Fill ‘er Up!
Note what type of water the iron requires. Many simply take tap water, but others require distilled water. There may be regional differences, depending on the water where you live. Using hard water can lead to a build-up of residue in the tank (or on your sewing project) and clogged steam vents, so check for a self-cleaning feature.
It’s a good idea to empty the water in your iron if you’re not going to be using it for a while to help prevent mineral build-up in the tank.
Plugging In
Think about where you’ll be ironing and check the cord length—they can be up to 12 feet long. Some irons offer a retractable cord for easier storage. Iron cord positions can be fixed or they can pivot for convenience of both left- and right-handed users. Cordless models are also available with a charging base, but keep in mind that the head has to be returned to the base frequently to reheat itself.
Sit-ups
Most irons sit vertically on their heel when not in use, but one brand {Oliso photo) has “legs” that raise it off the ironing surface when not in use, so there’s no need to set it upright. When you hold the handle, it lowers itself for use.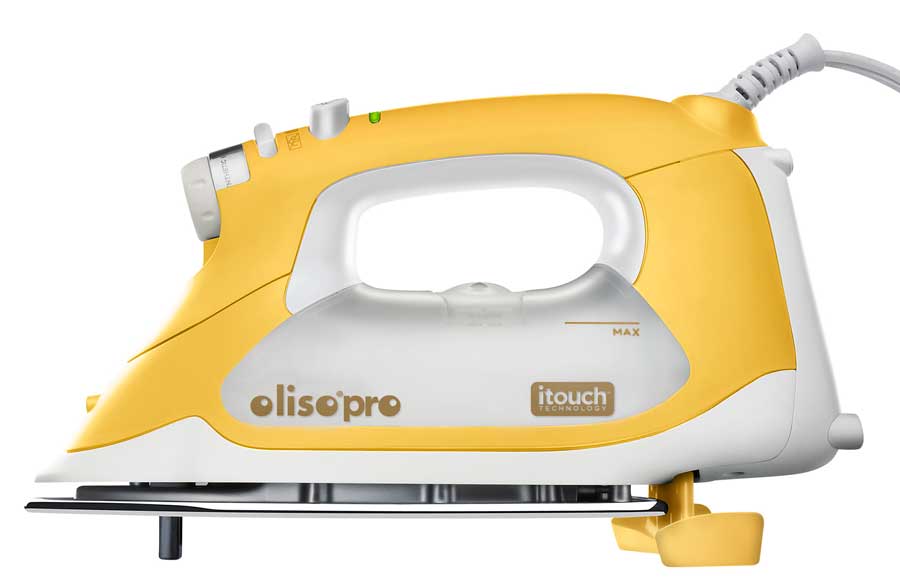
Liking it Hot
It’s important to let any iron fully heat up before using it. If you don’t, it may spit water onto your project. Some irons fully heat in 30 seconds, other take as long as 10 minutes. There may be a beeper or a light to indicate when the desired temperature is reached.
~Linda Griepentrog
Linda is the owner of G Wiz Creative Services and she does writing, editing and designing for companies in the sewing, crafting and quilting industries. In addition, she escorts fabric shopping tours to Hong Kong. She lives at the Oregon Coast with her husband Keith, and two dogs, Yohnuh and Abby. Contact her at .
- « Previous Page
- 1
- …
- 25
- 26
- 27
- 28
- 29
- …
- 79
- Next Page »
