View the Keynote speech from Deepika Prakash from Pattern Review at the 2018 American Sewing Guild annual conference in Las Vegas.
Flat Slider Zipper with Tab Locks
I Can’t Wait for this Zipper!
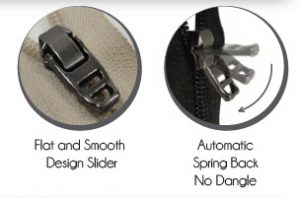 I’ve been working on the next series for ASG, including showing different zippers and techniques for inserting them in pants and skirts. While it’s easy to be intimidated by sewing zippers, stay tuned to learn a couple of tips and tricks that will prevent it from being a difficult sewing task.
One thing that has always bugged me about zippers though is the slide. On a standard zipper, when the slide is all the way to the top of the garment at the waistband, it forms a little lump. I have tried several things to try and minimize it only to wonder why no one has invented a flat slider. Something that when the tab is positioned, it aligns with the top of the slider and the slider is flat under the flap of the fabric. So, research began—I wanted to know, has someone besides me actually thought about this?
As it turns out, they have! YKK has developed the DS13 Semi-automatic slider (flat) slider and the tab locks into position when the zipper is closed. It’s been on the market for a few years in the commercial market for clothing and footwear and even won a “Good Design Award” in 2017.
Unfortunately, I have yet to find this flat slider zipper packaged for home sewers or found it in sewing stores. If you’ve seen it, please, let me know – I really want flat sliders!
Sew ‘til next time…enjoy the journey of sewing!
~Ramona
Sew Fun Tour: Go to Hong Kong? Are you kidding me?
 I’d never been to more than four states and I was thinking about going to the other side of the world, all by myself. Was I crazy? The caveat was that I ‘d be with other sewers and two experienced guides. What was the worst that could happen? Maybe I’d get lost in a foreign country—oh, wait, they speak English there.
I ordered my passport early and when it came, I thought “this is for real.” And it was…fast forward several months and I met Linda and Pauline at the San Francisco Airport, ready to take off on my big adventure. It was a long flight but, alas, that’s the only reasonable way to get there and anticipation was building among all the group members as to what we might find—certainly silks couldn’t be far away.
We had an effortless trip from the airport to the hotel, and some much needed sleep, only to wake to a sumptuous breakfast buffet with foods from Japan, China and familiar American favorites… and we could eat all we wanted. Wow!
Our orientation meeting covered everything we needed to know, from money conversion to local customs, food, etc. I still couldn’t believe that I was half way around the world! Our sightseeing tour showed us the city highlights, including Western Market—a mecca of fabric vendors—some marketplaces and shops, and notable city sights. It was exhausting, but I thought I’d retire early that night to catch up. Oh no, several people wanted to go out for dinner, so I went along. I didn’t know them, but it didn’t matter, as we all sewed and that was a common bond. And, we didn’t get lost!
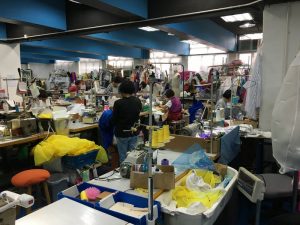 One of the things I most looked forward to was our visit to the costume shop, where Disney characters came to life and we learned the ins and outs of inflatable costuming. And, oh, did I mention the big remnant sale?
As the week progressed we learned how to work the MTR system (underground transportation) so we could get around the city on our own during the free days. Easy-peasy with the Octopus Card that’s used everywhere. All the maps were in English, so no worries. OMG, I’m traveling around a huge city in a foreign country.
The highlight of my trip was visiting the garment district—like NOTHING I’d ever seen before. With both street vendors and stores, most of us couldn’t drag any more purchases by the time we met back at the bus. (OK, true confession–I headed back there with a group of fellow tour participants on one of my free days, as one day wasn’t enough.)
 Our dinner cruise to Lamma Island was a treat, as we ate family style at a restaurant frequented by locals (not tourists), so we had the “real deal.” On the boat ride home, we watched the laser light show on Victoria Harbor.
I was never apprehensive about the city and Linda and Pauline told us everything we needed to know—not just about the tour activities, but also about optional things to do and places to go. I was a master of the MTR system by the time we left this wonderful city. The tour was wonderful and I fell in love with Hong Kong. I’m hoping to go back on my own soon.
ASG Member – KT, Portland, OR
Visit the Sew Fun Tours page to learn about all the tours offered by ASG.
Around the Country and Around the World with Sew Fun Tours
ASG’s popular Sew Fun Tours are a great opportunity for both members and non-members to celebrate their love of sewing, adventure and FUN through one of the many Sew Much Fun tours that ASG offers.
- Sew Much Fun Hong Kong
- Sew Much Fun Los Angeles
- Sew Much Fun New York (Spring and Fall)
- Sew Much Fun Northwest
Make Your Own “Sampler” Pack of Sewing Favorites
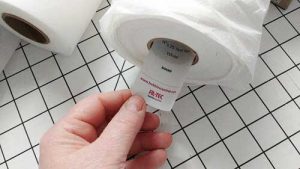 Like most sewing enthusiasts, I have sewing and embroidery supplies that I use over and over because they work well for many different applications. This is especially true for interfacings and embroidery stabilizers. To keep track of my supplies, I normally take the label off the outside of the roll and insert it inside the tube so I know what the product is. I have actually ordered a couple of things on the recommendation of a sales person and found I didn’t care for them and I want to be sure I do not re-order them—that is just as important to know as what I do like.
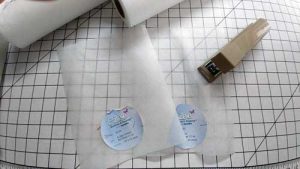 This morning when I reached for the rolls of my favorite fibrous water soluble and poly-mesh stabilizers to grab the tags to re-order, I found that one roll was missing its label – horror of horrors! I searched the distributor’s website and still couldn’t find the product so now the search is on through packing slips and websites to try to identify the product. I even tried to locate a sample pack, hoping I may find my beloved stabilizer within it, but no luck.
That action though, gave me an idea. Right then and there, I vowed to prevent this sewing malfunction from happening to me again by making my own sample pack. I cut large pieces of each product and stapled the label to the corresponding sample. While I still have to find the one product with the missing label, luckily it is not something I need to re-order immediately.
I also plan on doing the same with my favorite interfacings. I’m working on two series right now that require a lot of interfacing and, because I use so much, I tend to purchase my favorites by the bolt. Of course, there are no labels to peel off packaging to save so I can do one of two things:
- Take a photo of the label, print it, and staple it to the sample I cut off the bolt, or
- Wait until I get to the end of the bolt, save a final piece, and then peel the label off the end of the bolt and staple it to the sample piece.
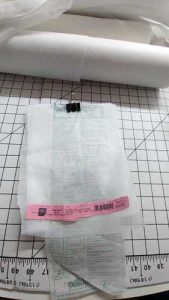 Knowing me, chances are by the time I get to the end of the bolt I’ll forget to save a piece and keep the label so I’ll probably opt for option 1. Another good thing to do is save a piece of the instructions that come on the interfacing bolt. Read and check them each time you purchase the product. Occasionally, as technology is updated, products may change slightly (think better glue) and instructions will be updated. If the interfacing is a specialty item like Hymo, then also attach information about where the product was purchased and any other identifying information
We always think we’ll remember what we did or where we purchased something, but we often don’t. Start making another type of reminder for sewing. Put information in a binder or even just clip things together like in this sample pack. Save yourself a lot of remembering and searching time which, of course, leaves more time for our favorite pastime—STITCHING!
Sew ‘til next time….enjoy the journey of sewing!
~Ramona
- « Previous Page
- 1
- …
- 54
- 55
- 56
- 57
- 58
- 59
- Next Page »


